This article explains how to download multiple files using ASP.NET Core MVC. First, create a table to store file information, such as filename and source path.
Here is the following step-by-step guide to download multiple files in ASP.NET Core MVC:
Table of Contents
Create an Asp.NET Core MVC Project
Assuming you have Visual Studio 2019 or Visual Studio 2022 installed, follow these steps to create a new ASP.NET Core Project.
- Open the visual studio (IDE).
- Click on the “Create new project” option.
- Choose “ASP.NET Core Web Application” from the list of available templates.
- Click the Next button.
- Then configure a new project, and specify the name and location of your project.
- Click the “Next” button.
- Then select .Net Core as the runtime and choose the version from the dropdown list at the top.
- Make sure to uncheck the checkboxes for “Enable Docker Support” and “Configure for HTTPS” since we won’t be using authentication.
- Click the “Create” button
Create a Model
namespace WebApplication_Download_Files.Models
{
    public class FileAssets
    {
        public Guid Id { get; set; }
        public string Filename { get; set; } = null;
        public string FileUrls { get; set; } = null;

        public FileAssets()
        {
            Id = Guid.NewGuid();
        }
    }
}
Configure Database Connection
Open the Program.cs file and add the following code snippet.
using Microsoft.EntityFrameworkCore;
using Microsoft.EntityFrameworkCore.SqlServer;
using Microsoft.Extensions.Configuration;
using WebApplication_Download_Files.Models;


var builder = WebApplication.CreateBuilder(args);

//Connection string
// "connectionstr": //"Server=localhost;Database=inventoryDb;Encrypt=False;Trusted_Connection=True;"

builder.Services.AddDbContext<AppDbContext>(opt=> opt.UseSqlServer(builder.Configuration.GetConnectionString("connectionstr")));
// Add services to the container.
builder.Services.AddControllersWithViews();

var app = builder.Build();

// Configure the HTTP request pipeline.
if (!app.Environment.IsDevelopment())
{
    app.UseExceptionHandler("/Home/Error");
}
app.UseStaticFiles();

app.UseRouting();

app.UseAuthorization();

app.MapControllerRoute(
    name: "default",
    pattern: "{controller=Home}/{action=Index}/{id?}");

app.Run();
Migration
Run the following command in the package manager console.
add-migration 'Init-create'
update-database
Create Controller
Open the HomeController.cs file. Create a new method named “downloadAll”
using Microsoft.AspNetCore.Mvc;
using Microsoft.EntityFrameworkCore;
using System.Diagnostics;
using System.Text;
using WebApplication_Download_Files.Models;
using Microsoft.AspNetCore.Hosting;
using System.IO.Compression;

namespace WebApplication_Download_Files.Controllers
{
    public class HomeController : Controller
    {

        private readonly AppDbContext _context;
        private readonly IWebHostEnvironment _env;

        public HomeController(AppDbContext context, IWebHostEnvironment env)
        {

            _context = context;
            _env = env;

        }

        public async Task<IActionResult> Index()
        {
            return _context.FileAssets != null ?
                        View(await _context.FileAssets.ToListAsync()) :
                        Problem("Entity set 'AppDbContext.FileAssets'  is null.");

        }

        public IActionResult downloadAll()
        {
            var ZipFile = $"docFile-{DateTime.Now.ToString("yyyy_MM-dd-HH_mm_ss")}.zip";

            using (var memorystream = new MemoryStream())
            {
                using(var archieve = new ZipArchive(memorystream,ZipArchiveMode.Create,true))
                {
                    _context.FileAssets.ToList().ForEach(files=>
                    {
                        var zipentry = archieve.CreateEntry(files.Filename);
                        var stringpath = Path.Combine(this._env.WebRootPath +  files.FileUrls);
                        byte[] bytes = System.IO.File.ReadAllBytes(stringpath);
                        using (var filems = new MemoryStream(bytes))
                            using(var openstream = zipentry.Open())
                        {
                            filems.CopyTo(openstream);
                        }

                    });
                }
                return File(memorystream.ToArray(), "application/zip", ZipFile);
            }
        }
    }
}
Create View
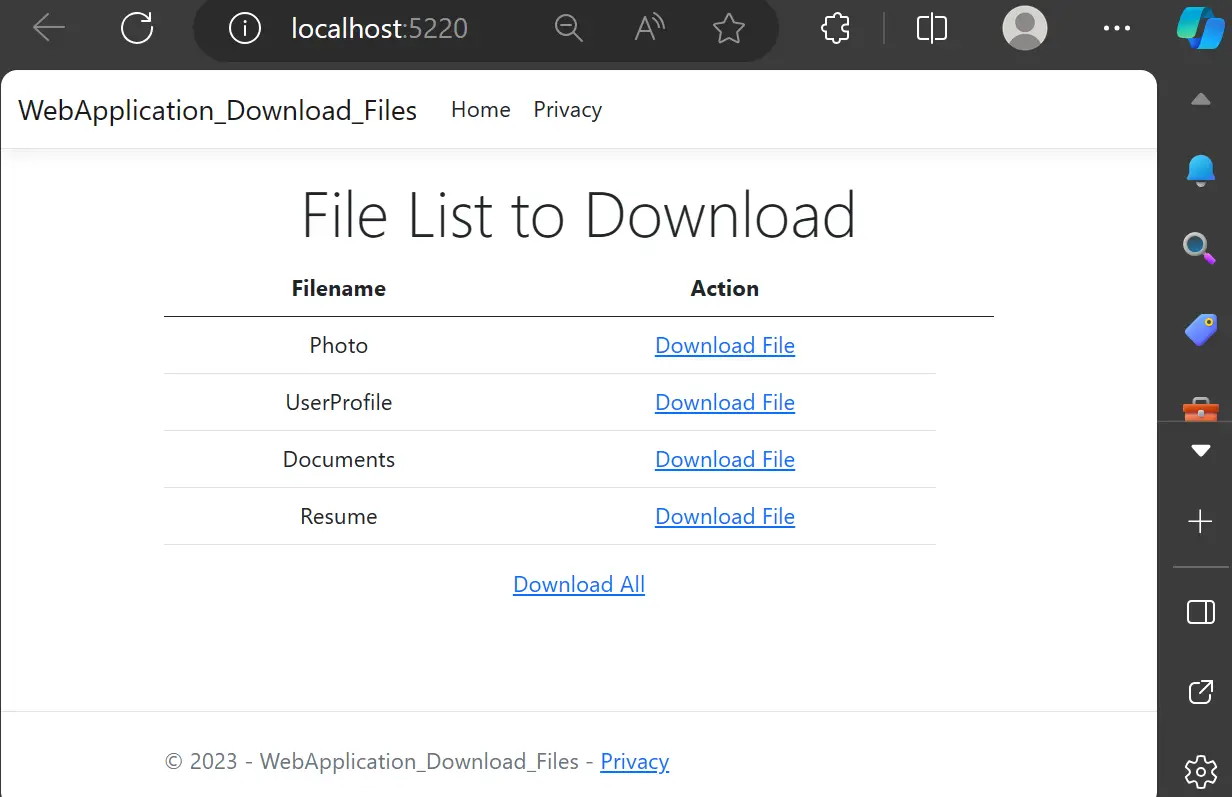
Open the Index.cshtml file and update the following code:
@model IEnumerable<WebApplication_Download_Files.Models.FileAssets>
@{
    ViewData["Title"] = "Home Page";
}

<div class="text-center">
    <h1 class="display-4">File List to Download</h1>


    <table class="table">
        <thead>
            <tr>
                <th>
                    @Html.DisplayNameFor(model => model.Filename)
                </th>
                <th>
                    Action
                </th>
                <th></th>
            </tr>
        </thead>
        <tbody>
            @foreach (var item in Model)
            {
                <tr>
                    <td>
                        @Html.DisplayFor(modelItem => item.Filename)
                    </td>

                    <td>
                        @Html.ActionLink("Download File","download",new{Filename = item.FileUrls  } )
                    </td>

                </tr>
            }
        </tbody>
    </table>
    <a asp-controller="Home" asp-action="downloadAll">Download All</a>

</div>
output:

See Also:
Dynamic Middleware | Conditionally add middleware in ASP.NET Core